We know how hard it can be to find the time and resources to plan a virtual event. With the objective of facilitating this process, ExpoSim helps you get the most value from your event while saving you time and money at the same time.
Embedded with fully customizable, no-code, DIY features, ExpoSim presents suites of microservices that help organizers manage their end-to-end virtual and hybrid events such as Webinars, Conferences, Town halls, Interactive B2B Meet-ups, Virtual Job Fairs, Trade Fairs, Networking Events, among others.
As well as helping you to design your first virtual events of any size, our advanced simulation platform also combines Metaverse features to enhance your event experience.
In addition, we have worked relentlessly to provide the most advanced features, not only to simplify the event hosting process but also to give you a real-life event experience.
ExpoSim’s advanced and personalized features make setting up your event a breeze. However, if you run into issues, here’s a step-by-step guide on how to set up your ExpoSim event.
App ExpoSim Sign up and Registration
To start creating your first virtual event, and take advantage of the platform’s features and tools for organizers, go to the app.exposim.io and complete the signup process.
The signup process is outlined below
-
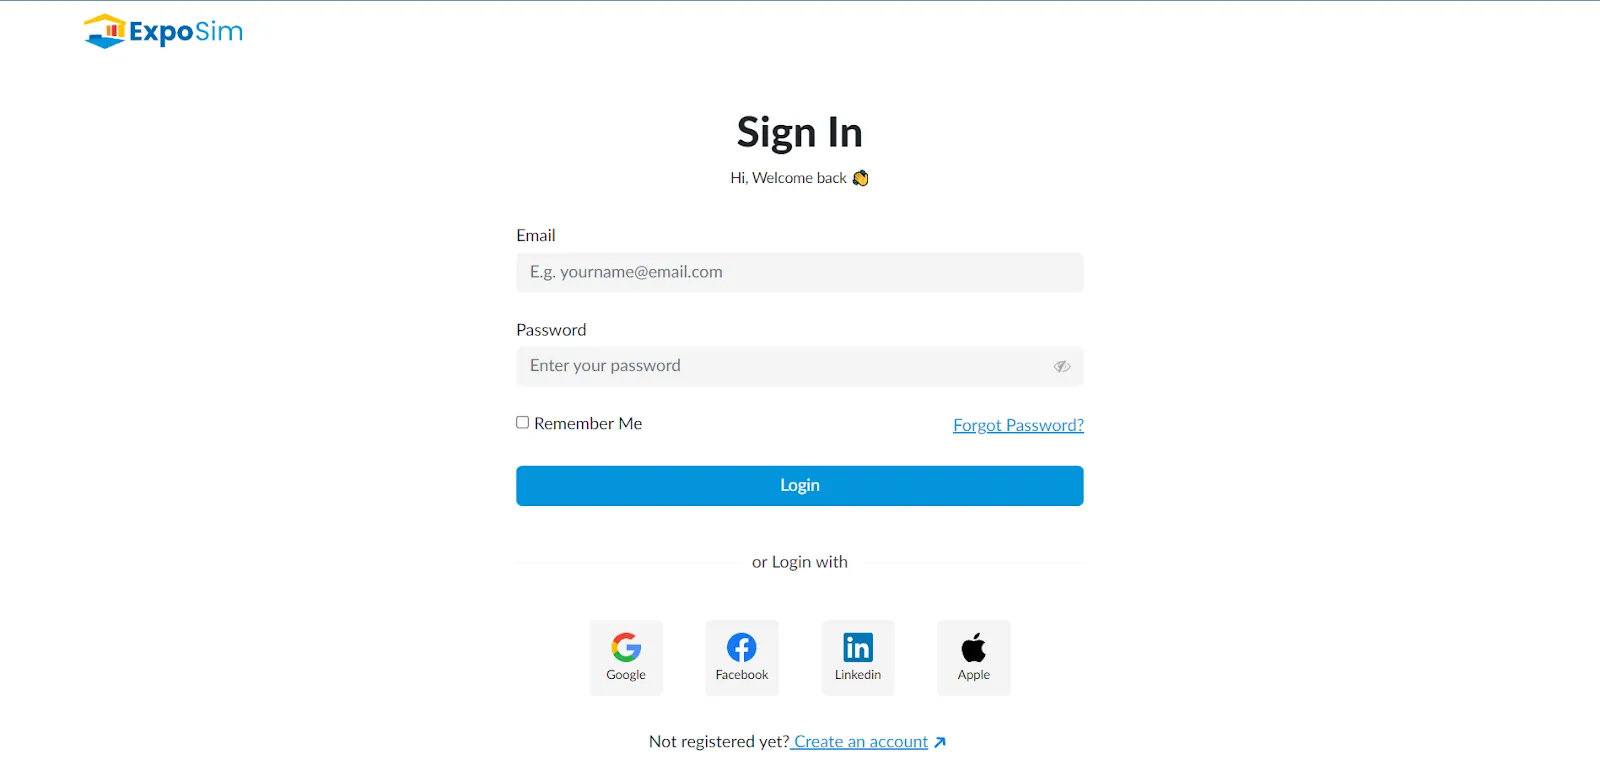
- As an organizer, if you have not already registered, you can sign up using Gmail, Facebook, LinkedIn, or Apple.
-
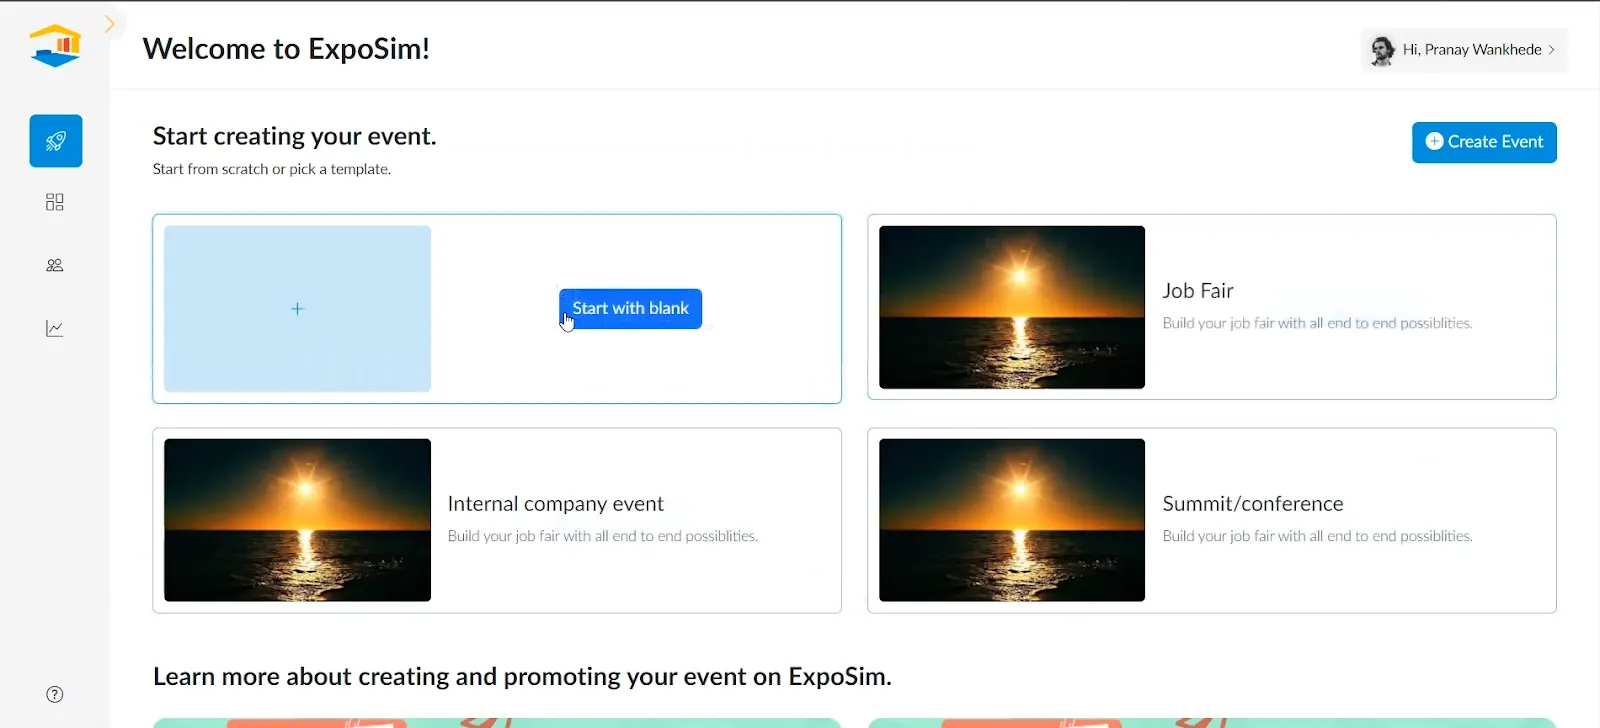
- Upon logging in, you will see a list of different event templates from which you can choose the type of event you want to organize, or you can create one from scratch.
-
- Click on the Create Event button to create a customized event
Once you click Create Event, you will be prompted to fill out a form.
Fill out the relevant event details like Event link, Event name, Event description, Event Start & End date, etc.
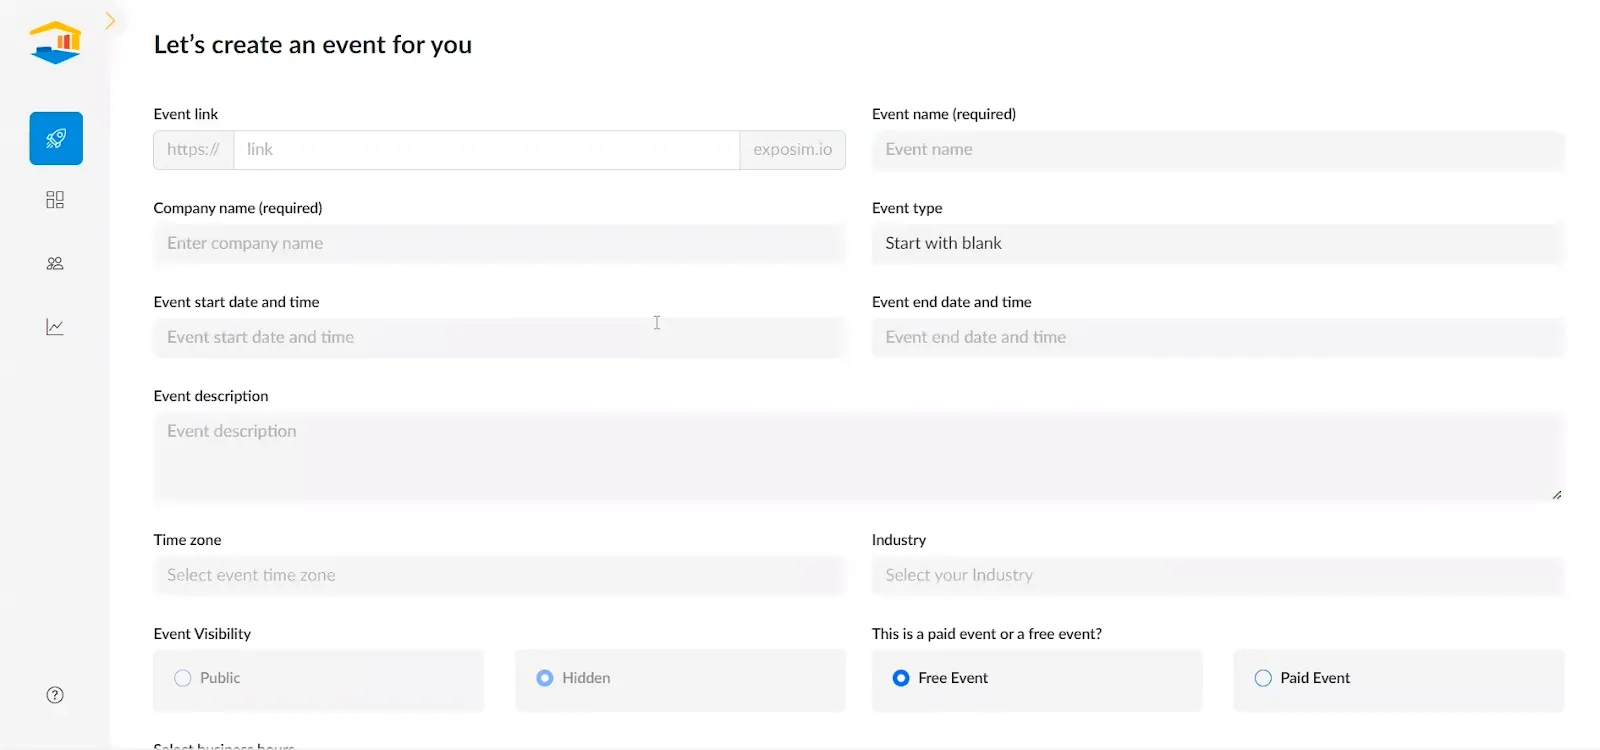
Once all the details have been added, your new event will be created
Now that our event has been created, please refer to the Manage Events section to see the list of events that have been created.
It will display a list of events, the date of the event, the status of the event – completed or in progress, as well as registrations.
As the next step to customize your event, select the event on the list and click on the edit button.
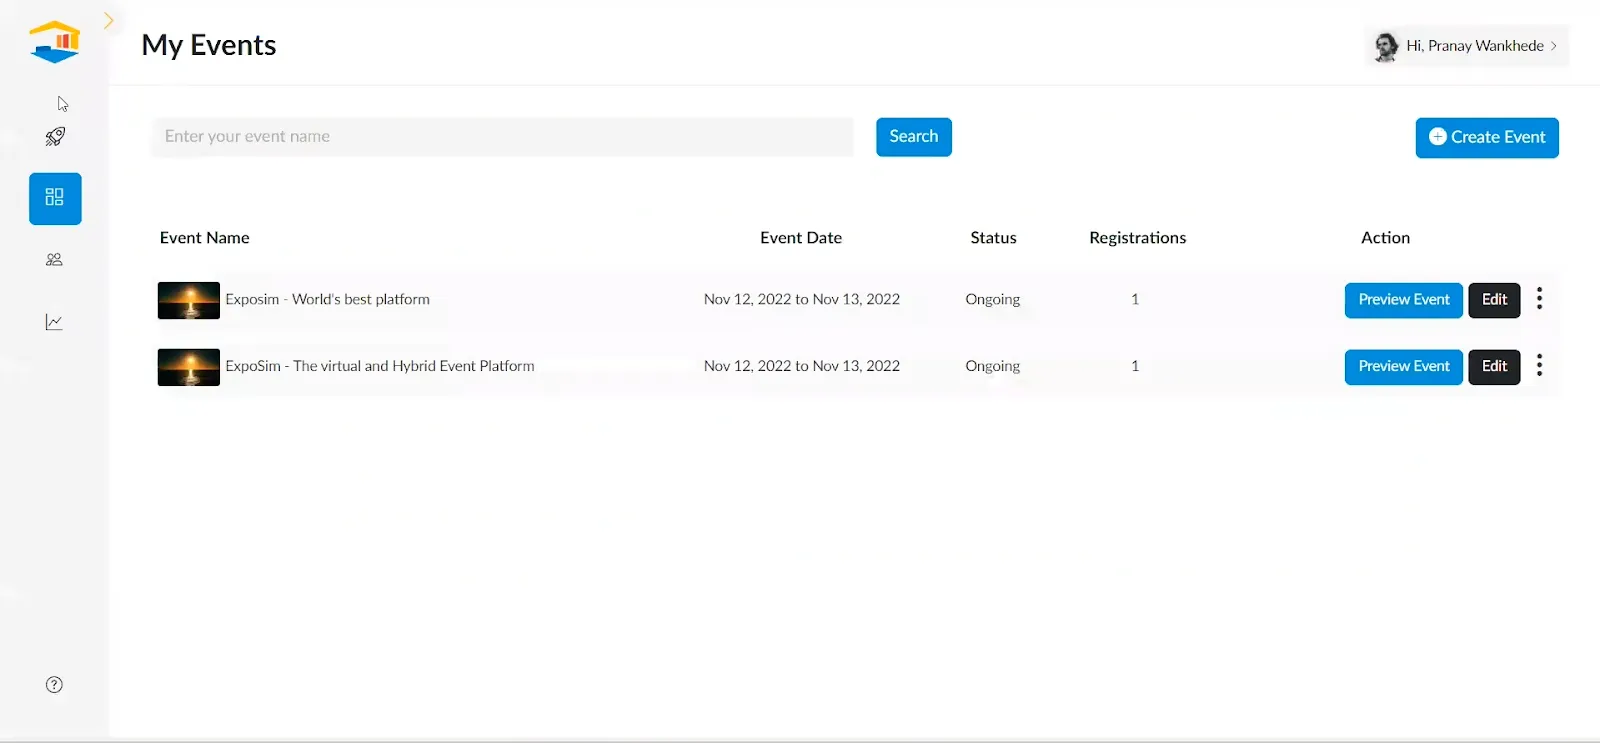
As soon as you click on edit, you will be redirected to the Main Dashboard of the event as an Organizer where you can customize your event accordingly.
On the main dashboard, you can add details about your event, such as Contact Person details, Registration Form details, Landing Page details, etc. Please refer to the following instructions for getting started.
The First and most important step – Adding Event Details
While you have already added event details during the event creation step, you can further customize and add detailed information to your event in brief from the Main Dashboard.
Follow the below steps to add detailed description to your event.
-
- Add Event Name → Company Name → Tagline → Industry → Description → Time zone → Start Date & Time, End Date & Time → Business Hours, and event logo in the dimension mentioned below the box.
-
- As the next step, select the features that you require for the event and enable registration from extra features.
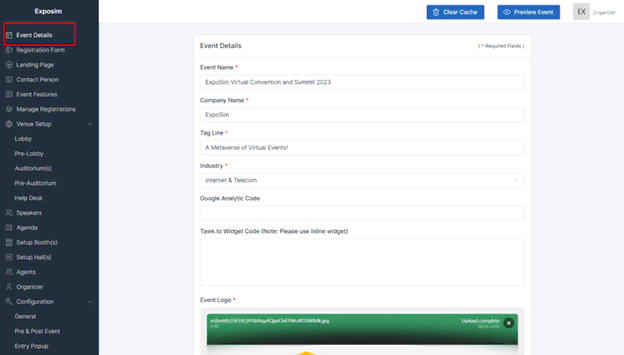
Note – The difference between Start and End times and business hours is that calendar invite is sent according to the time mentioned in start and end time whereas if you have an exhibition hall in your event with meeting scheduler feature where live video call meetings can be scheduled, you can fix the time between when the meetings can be scheduled by adding the business hours.
Add contact person details
Organizers need to add the Contact Person details here. This information will be shown in the registration confirmation email. Attnedees will receive this information on their registration email and they can contact the person in case of any queries.
Add Contact Person Details
-
- Add Name, email ID, and phone number → Submit.
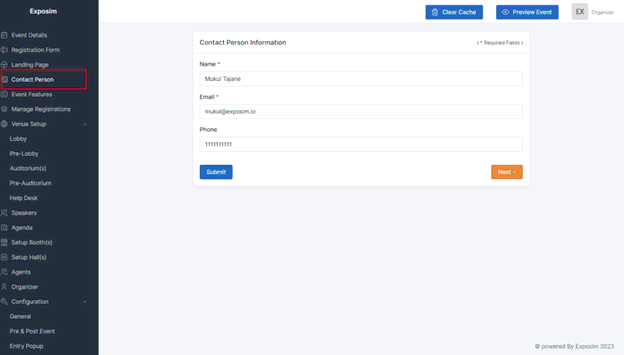
Your event details are submitted
Set up Registration form for your event
To customize the registration form for the event, go to- Registration Form in Main Dashboard. You can add multiple fields in the registration form according to what information you require from the attendees.
You can see some fields are already added to the form, you can keep those fields as it is or can delete those fields.
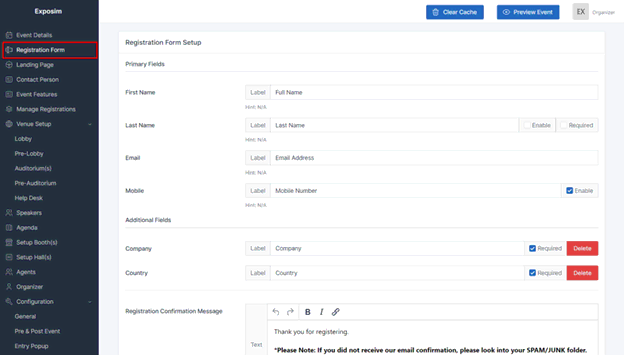
Now, to add the field to the registration form, follow the steps:
Click on Add Field as shown below
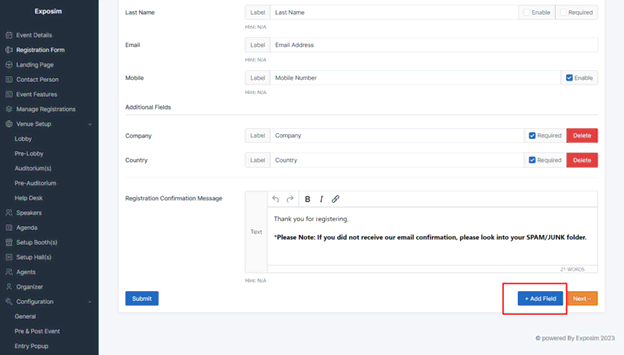
-
- Add Field name and Select the type of field like Text, dropdown, Email, Text area, etc.
-
- Click on Add Field
-
- Submit. Your Field is created in the registration form.
Verify/Edit Registration Confirmation Email
To check/edit the registration email use following steps:
-
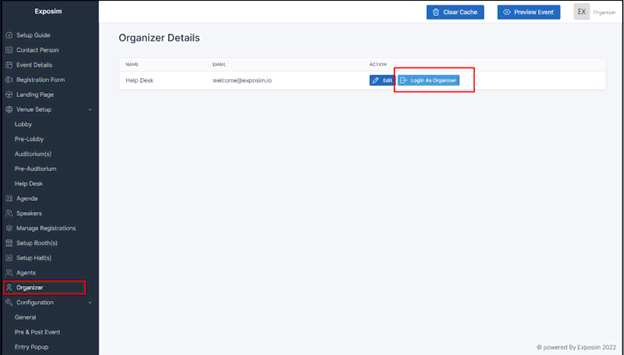
- Go to Organizer and click on Login as Organizer
-
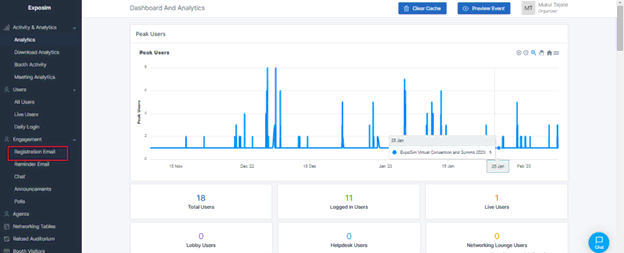
- A new tab will open with the Organizer Dashboard. Then click on the Registration email button.
-
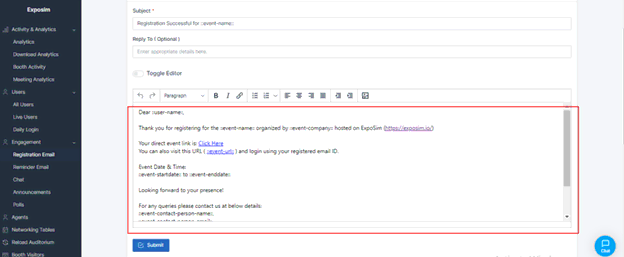
- You can make changes in the contents of the registration email.
-
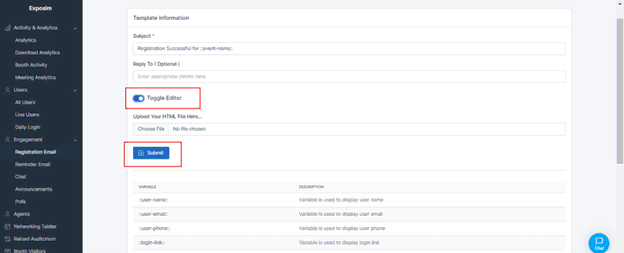
- If you have the HTML file of the registration email, then you can upload it too. Just enable the Toggle Editor and upload the file.
-
- Test the email by adding your registered email address and clicking on Test Email.
Landing Page
A landing page is the first page of the event where registrations and logins will take place. Add landing page and other pages (optional) creatives in the dimensions mentioned below the upload areas.
Landing page has 3 different sections-
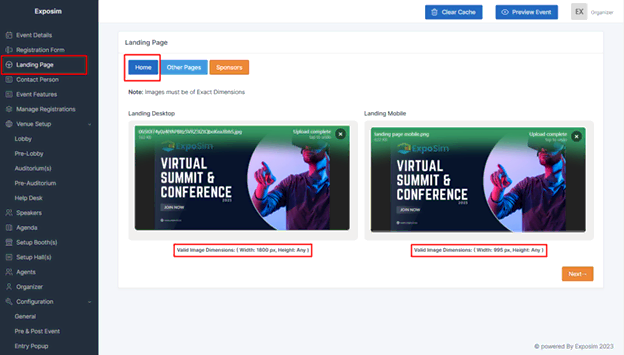
Landing Page- Home (Mandatory)
-
- It is the main page where the attendees come to register for the event.
-
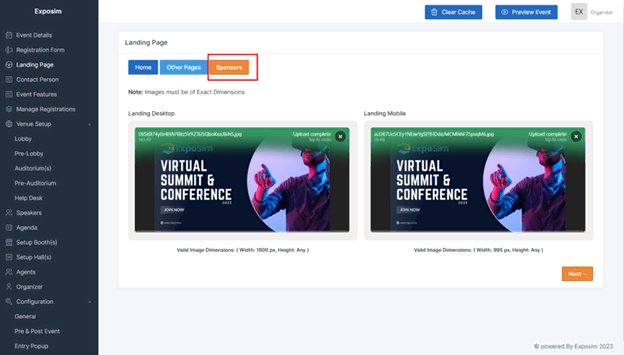
- Organizers need to make the creatives of landing page for both desktop and mobile users and upload in Home page section, as shown below-
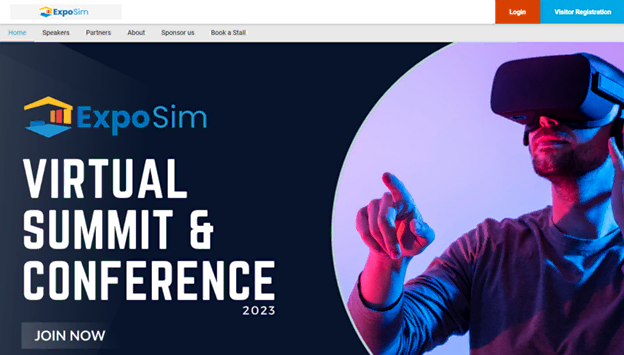
This is how your image-based or static landing page will look like after you customize it.
Landing Page–Other Pages (optional)
-
- If you want to display the speaker, sponsors, agenda and other information, you can make it creative and add it in other pages.
-
- Other Pages have the option to add a google form to become a sponsor or speaker.
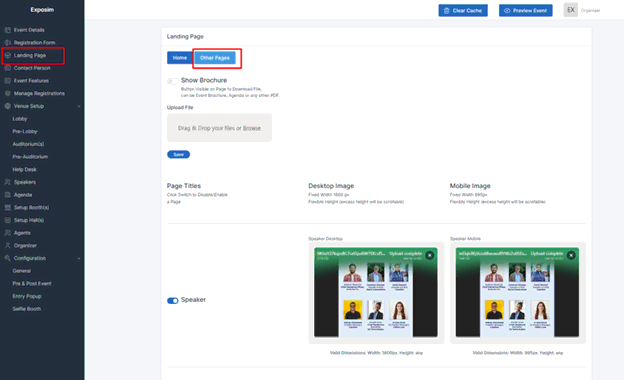
Backend to add Landing Page and Other pages
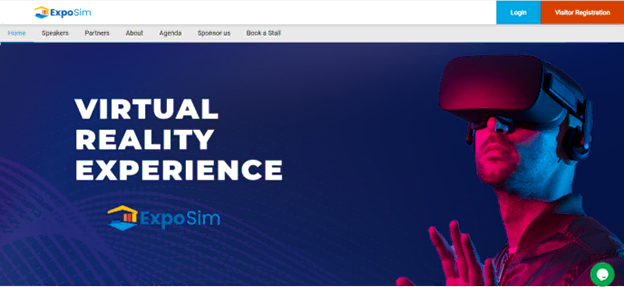
Frontpage after adding landing page and other pages
Landing Page – Sponsors (For Mobile App users)
-
- To add the sponsors of your event. This will be shown only in ExpoSim’s mobile app.
-
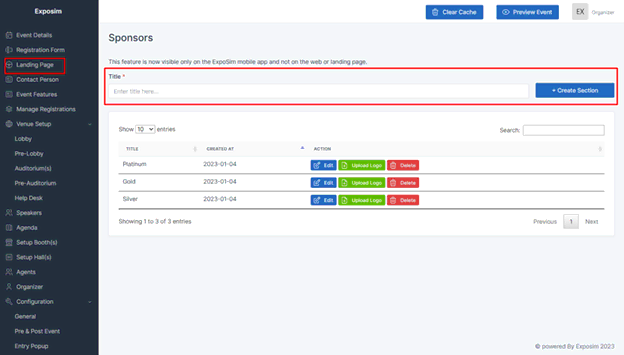
- Organizers can seggregate/categorize their sponsors here.
Organizers can categorize their sponsors by creating the category and adding respected sponsors to that category.
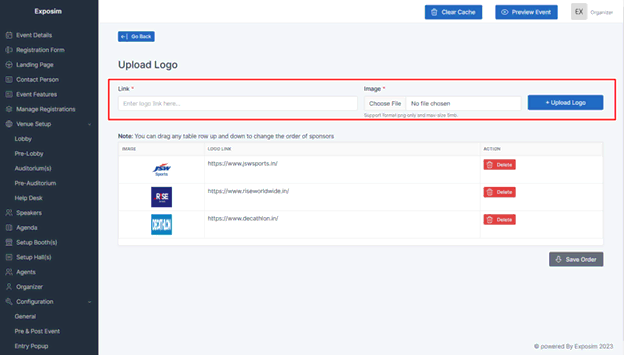
To add the sponsors- After creating the category (as shown above) click on upload logo and add the company website URL and upload logo.
After the first three steps, you are all set to start the registration process. Make sure to register yourself first and check whether everything is correctly added.
Event Features
To add the features in the event, Event feaures section is used. Go to Main dashboard and click on Event Features. Organizers can add Auditorium, Exhibition Hall, selfie zone, networking lounge from this section,
Organizers can also enable or disable the Registration and Login button from this section.
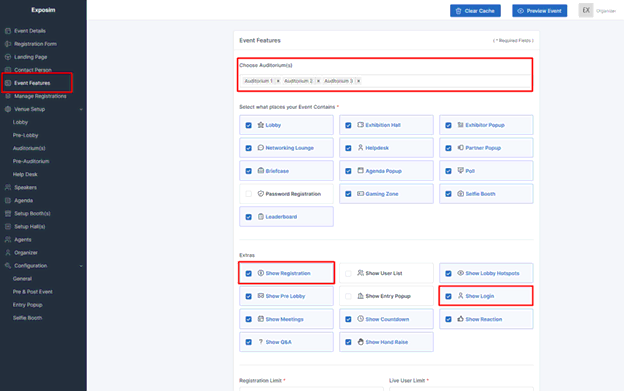
Manage Registrations
You can check all the registrations happening from Manage Registration. You can also upload bulk data from the backend. Go to the organizer dashboard if you further want to check the analytics of the event and download visitor data.
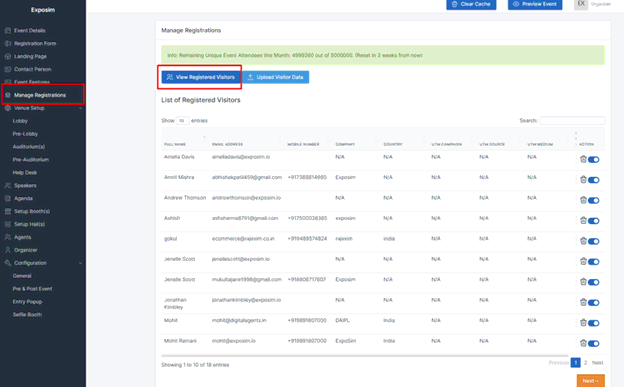
For bulk upload,
-
- Click on upload visitor data
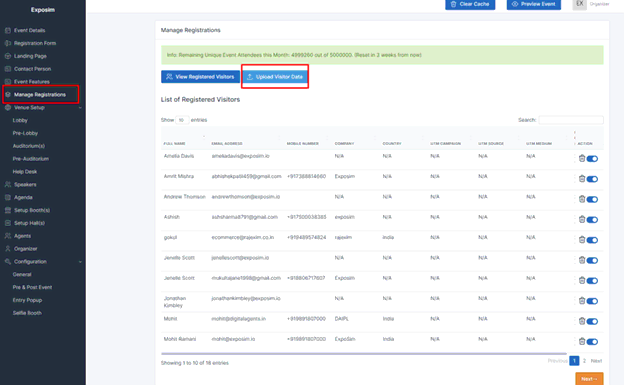
-
- Download the CSV template
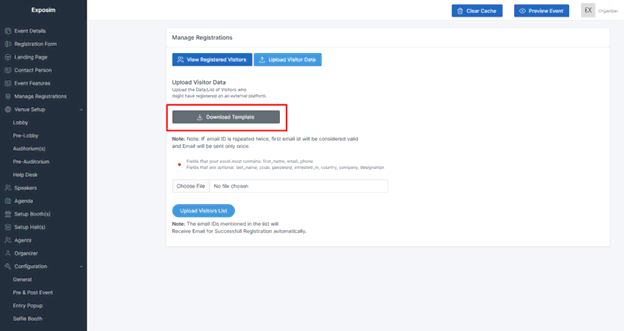
-
- Add the data (Name and email are compulsory, the rest of the data is optional)
-
- Upload the CSV on the platform.
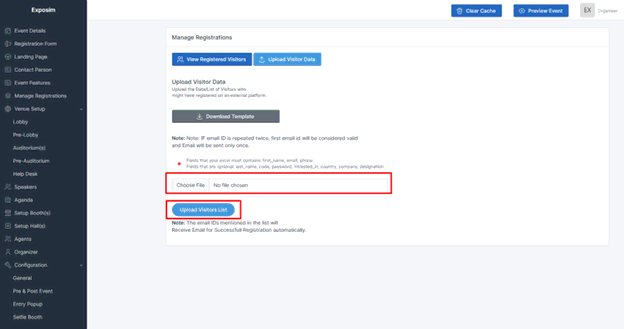
Note – As soon as you upload the bulk data, auto-generated confirmation is sent to them.
Venue Setup
ExpoSim offers a wide range of features to facilitate your event setup process. You can take advantage of these tools to maximize the potential of your event.
Basic Features – Lobby, Auditorium, Helpdesk
To add basic features like Lobby, Auditorium, and Helpdesk to your event go to-
Main Dashboard > Event details > Enable/disable features you have opted for your event.
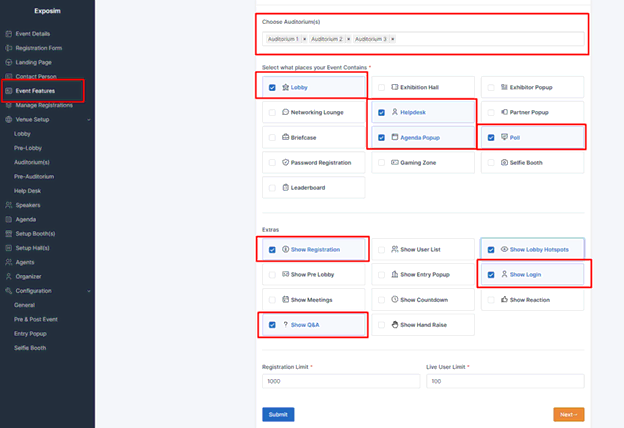
-
- Basic Features consist of Lobby, Lobby Hotspots, Auditorium, Agenda, and Helpdesk
Add brandings in Lobby, Auditorium, and Helpdesk
-
- Select the layout for the venue – https://rebrand.ly/branding-material
- Go through the guide of the layout and select the desired layout.
-
- Go to the Main dashboard and select desired templates of Auditorium, Lobby, and Helpdesk.
-
- Create the brandings in the required dimension.
-
- Upload the creatives in the dashboard.
-
- To check the creatives in the event, click on the preview event from the top right.
Note – To enable the preview event feature, make sure one person is registered in the event.
Lobby TV Video
-
- Go to Venue Setup in Main Dashboard
-
- Click on Lobby
-
- Select the video provider site- YouTube/Vimeo
-
- Add the embed link to the VIDEO LINK section
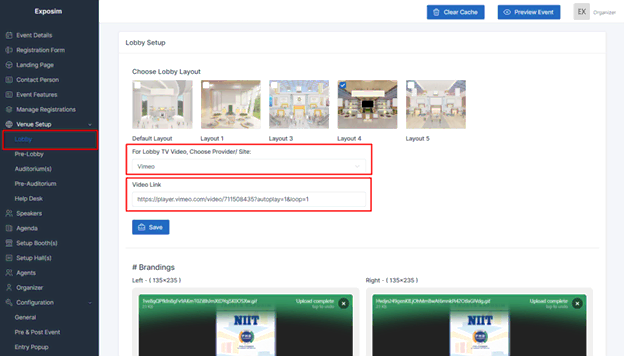
Note – The link to be added in the video link section must be an embedded link. To get the embedded link of a YouTube video.
-
- Select a YouTube video
-
- Click on share
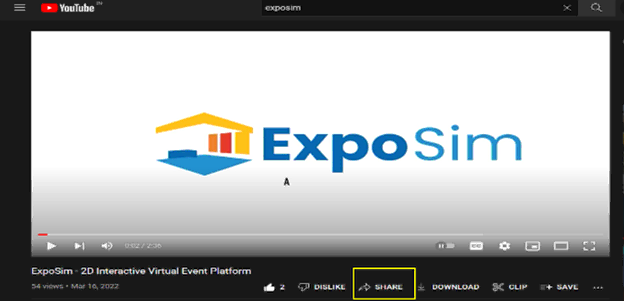
-
- Click on Embed

-
- Copy the link between the two inverted commas in the second line as shown below.
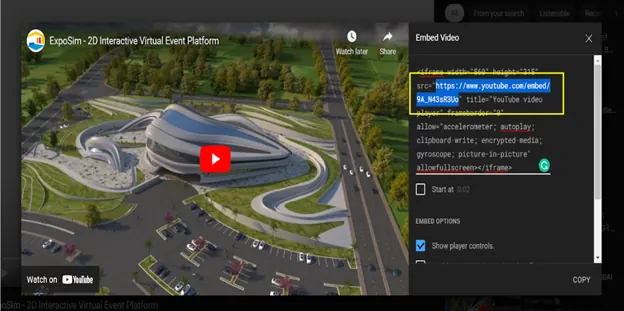
Note: If you do not have a YouTube link, then you can upload Vimeo embed link also. Use the following procedure to upload a video on Vimeo and get the link.
-
- Visit https://vimeo.com/ and create your free account
-
- After login, Click on New Video in the top right corner to upload your video

-
- After successfully uploading the video, open the video and click on Embed in the top right corner of the page

-
- Copy the embed link after the double quote mark in the third line till “?” mark. As shown below

Help desk Video
-
- Go to Helpdesk from Venue setup in Main Dashboard
-
- Add YouTube/Vimeo embed link of your video in Helpdesk Video URL section.
Embed Link – Select a YouTube video → Click on Share → Click on embed → Copy the link between the inverted comma in the second line and paste it into the video URL section as shown below.

Lobby Hotspots
They are the blue buttons as shown below that take you directly to the mentioned feature from the lobby. To enable it, go to: Event details and enable Lobby Hotspots.
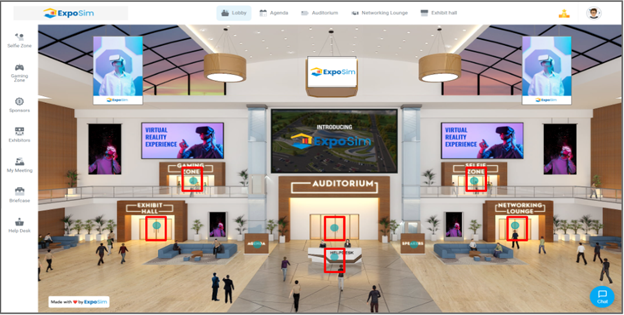
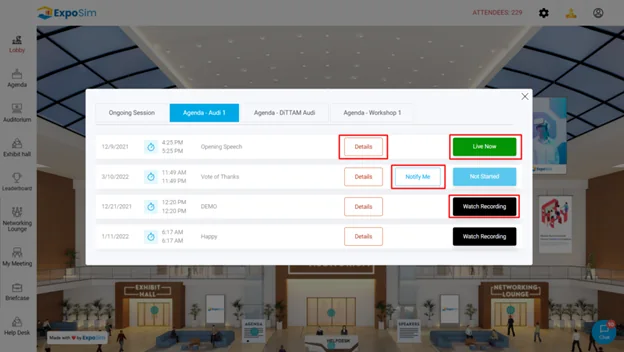
Agenda Pop Up
It shows the details of the sessions, previous session recordings and an option to block an individual session in your calendar through the Notify Me feature.

Multiple Auditoriums
ExpoSim allows Organizers to add multiple auditoriums in the event.
These can be added from the main dashboard > event details select auditoriums.

If an event has multiple auditoriums in it, then Pre-Lobby will be automatically enabled and organizers need to set up the Pre-lobby area. To set up the Pre-Auditorium area, go to Venue Setup click on Pre-Auditorium to add the branding in it.
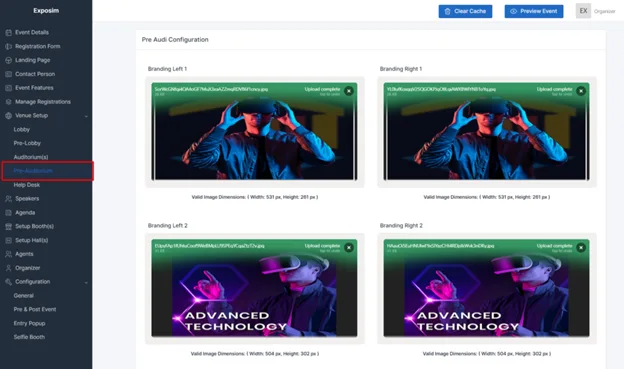
Pre-Lobby
Organizers can add a pre-lobby page in their event. This page provides extra branding space for event organizers. After registration when attendees logs in for the event, they will enter the Pre-lobby area.
In order to use Pre-lobby, first it needs to be enabled. To enable it, go to- Main dashboard > Event Features > Enable Pre-lobby
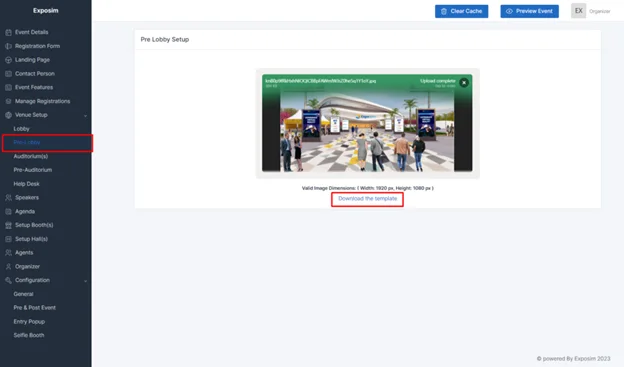
This is how the Pre-Lobby area looks after adding creatives/banners in it.
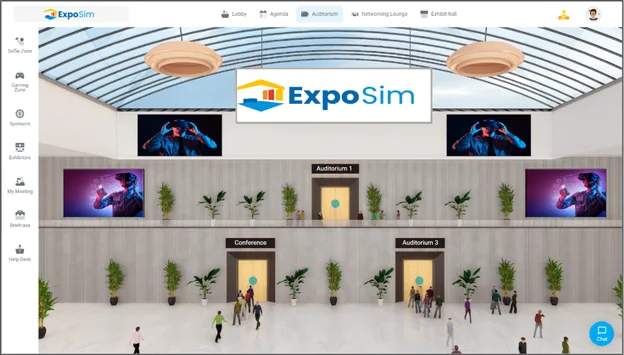
Live streaming Setup in Auditorium
Live session will be streamed in the auditorium. If you have multiple auditoriums in your event and all those auditoriums have live sessions in it, then you have to setup the live streaming for every auditorium sepeartely.
To setup the live streaming in the auditoirum, go to-
Main Dashboard > Auditorium > Meeting and Streaming Service Setup
Click here to know more about the live streaming setup.
Adding Host & Co-host
Host and co-host needs to be added in the auditorium in order to see the Q&A and to join the backdtage and start the meeting (Only if you are using ExpoSim as a meeting Service in live streaming setup)
To add host & co-host, go to-
Main Dashboard > Auditorium > Host & Co-host
Speakers
In Speakers section you can create the speakers profile and allot them to their live sessions. After adding the speakers to the particular session, attendes can ask questions to them from Q&A.
To create the speakers profile go to- Main Dashboard > Speakers > Create Speaker
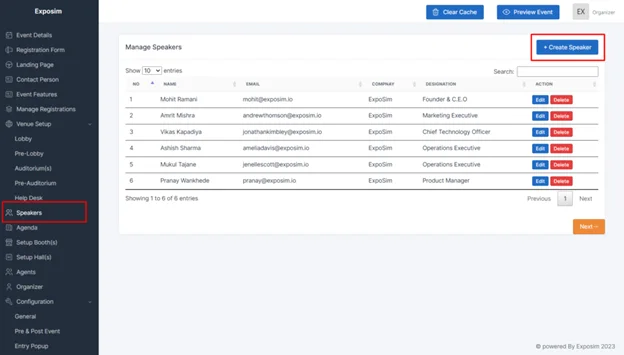
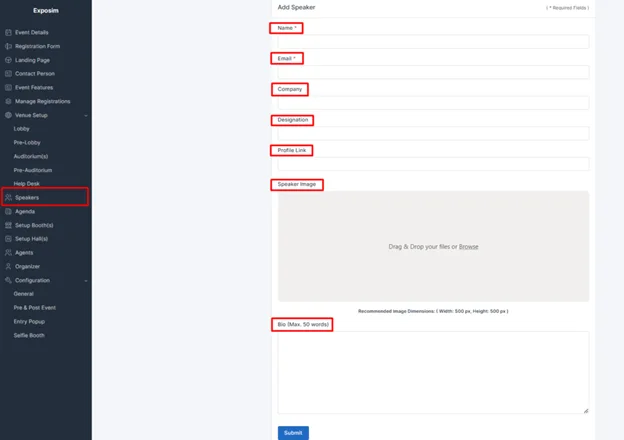
In the Profile Link section, you can add LinkedIn/Facebook/Twitter profile link of speakers. Mobile app users can visit the speakers profile.
Agenda
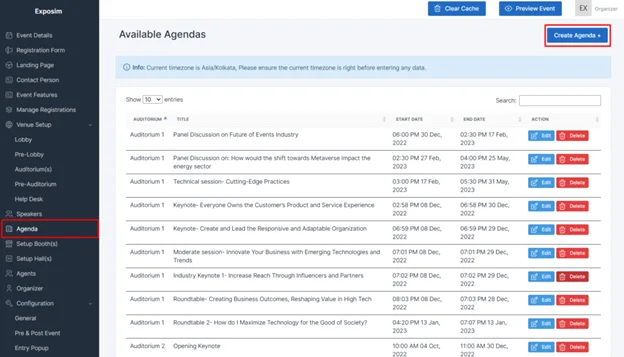
In Agenda section organizers can add the session-wise agenda of the live sessions happening throughout the event. In these sessions, organizers can add the details of speakers or sessions.
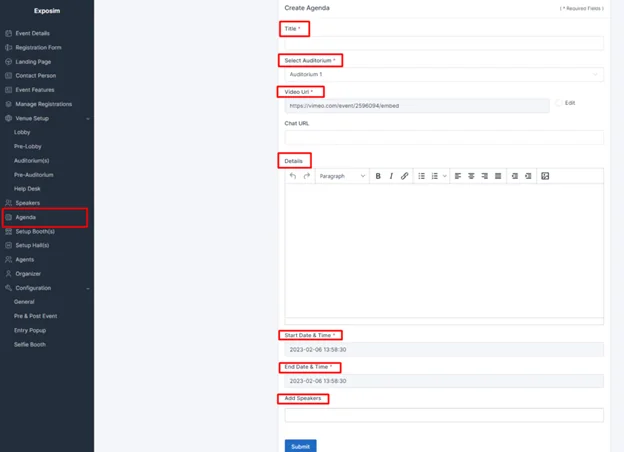
To add the agenda, go to- Main Dashboard- Agenda > Create Agenda
Add title of agenda, select the auditorium where the this live session will be shown, Video URL will be auto-filled from Live streaming setup. Select data and time of that session. Add speakers to the session.
It shows the details of the sessions, previous session recordings and an option to block an individual session in your calendar through Notify Me feature.
This added agenda will be shown in the event like this-
How to add recording of completed sessions
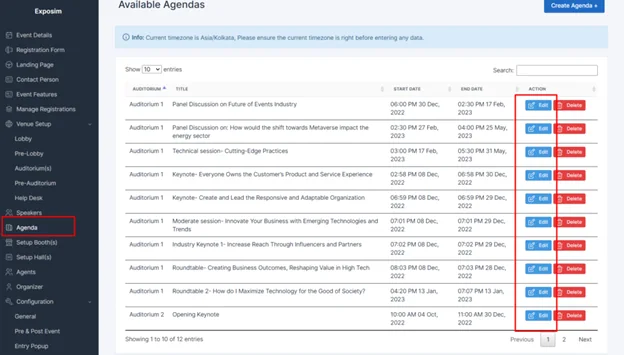
Once the session ends, organizers can add the recording of the live session to that agenda from Agenda section.
To add the recordings, click on edit button of the agenda and add the embed link of the recording in Video URL section.
Setup Booth(s)
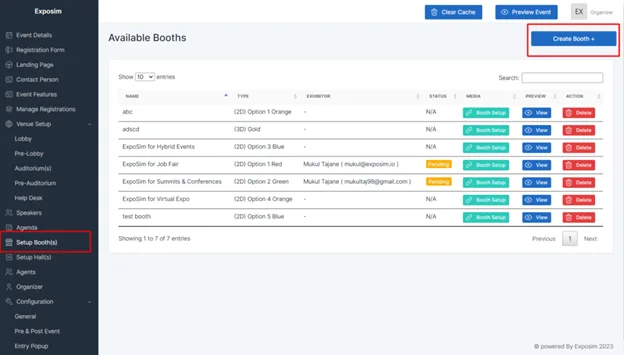
In the setup booth(s) section, organizers can create the virtual booths for the Exhibitors and sponsors
To create booths, go to-
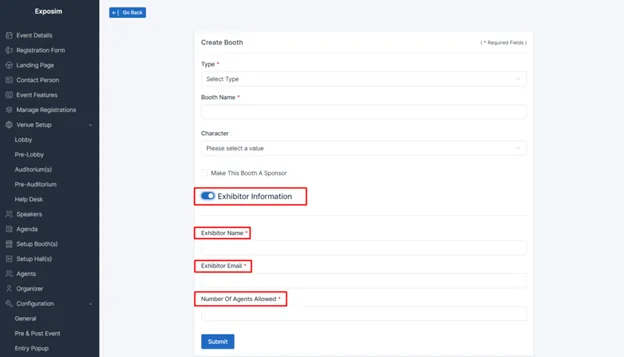
Main Dashboard > Setup Booth(s) > Create booth
-
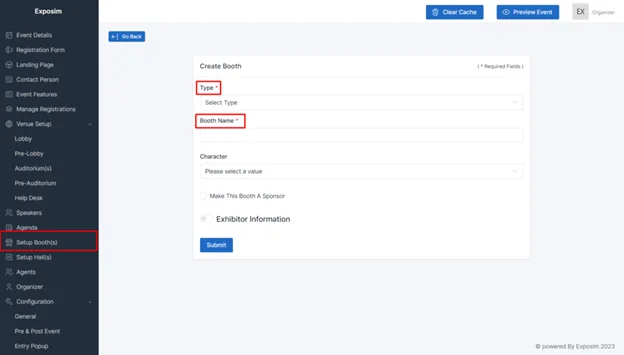
- Select booth type and add company name If you want to make the booth for Sponsor then enable the Make this Booth A Sponsor checkbox.
-
- To send the details to the exhibitor to let him set up their own booth, enable exhibitor information toggle button and add exhibitor’s name, email ID and number of agents (by default 5).
-
- Submit, the booth will be created.
Note – After clicking on submit, exhibitors receive an autogenerated email from [email protected] with booth setup dashboard URL and the login credentials for the same.
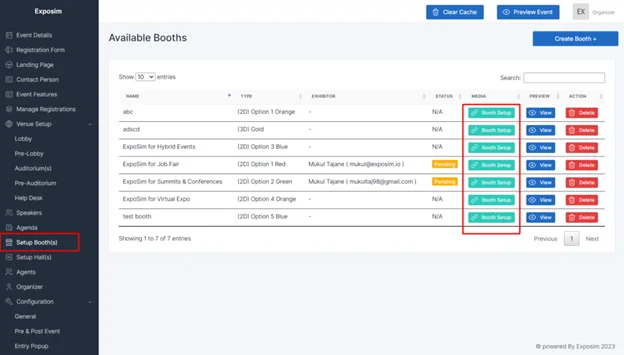
If organizers wants to setup the booth of their Exhibitors/Sponsors, then go the booth Setup page you will see the list of booths added in the event. Click on Booth Setup button which will take you to the Exhibitor dashboard.
How to Setup Booths
In te Setup Booth(s) section, list of all the booths will be shown.
-
- Click on Booth setup button
-
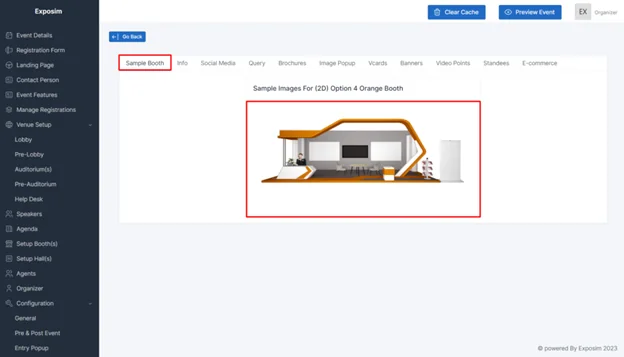
- Exhibitor dashboard will open, firstly, Sample booth section will show the layout of the booth
-
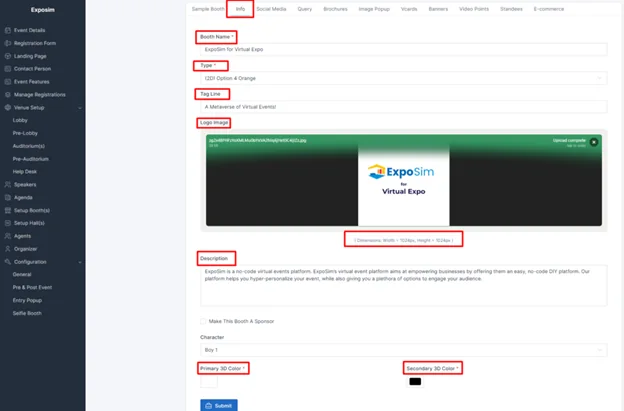
- Info- In info section upload company logo, add tag line, description of company. Select Primary 3D color and Secondary 3D color for Company name and name pallete.
-
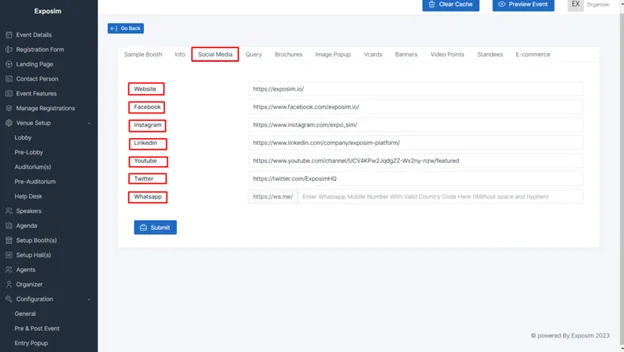
- Social Media- Add company website and links of various social media handles of the company.
-
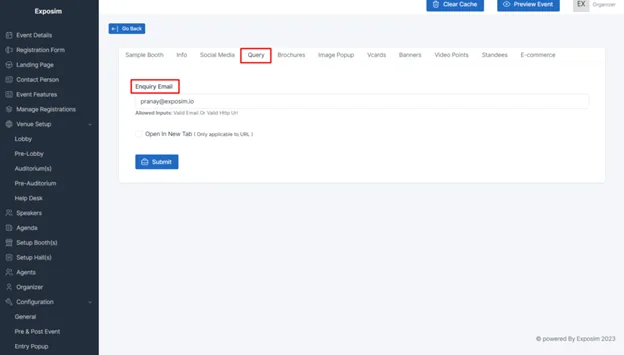
- Query- In query, add an email ID on which booth visitors can send their queries. You can also add google form links here.
-
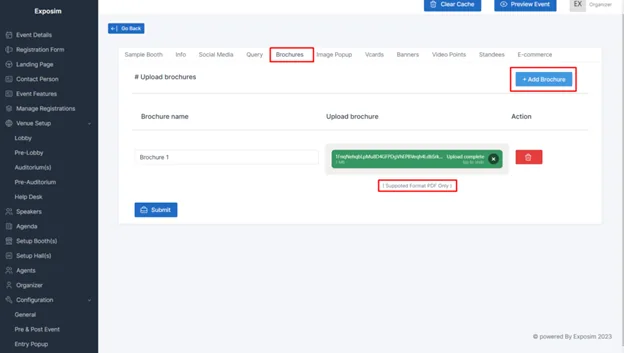
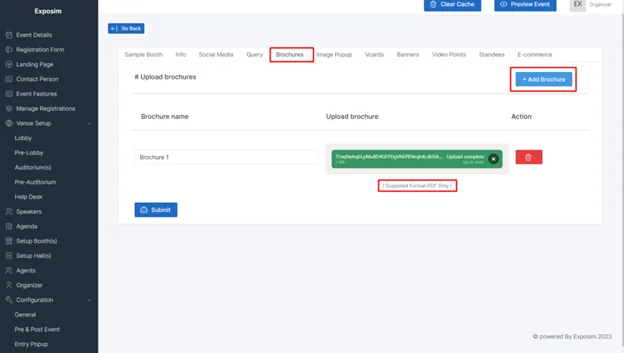
- Brochures- Add company brochures to this section. Can add upto 10 brochures here.
-
- Image Pop Up- Apart from Banner and Standee if exhibitor wants to showcase more images on sevices provided by them, they can add these images to this section. Can add upto 10 images here.
-
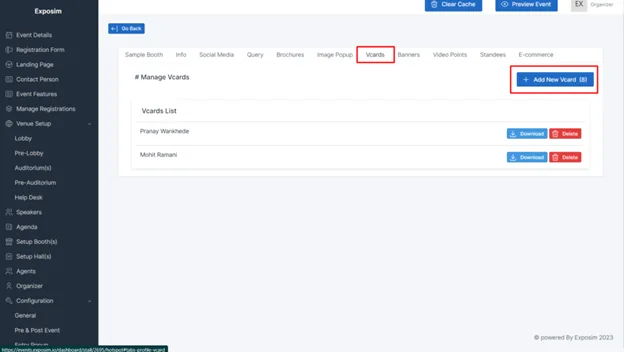
- Vcards- Exhibitors can create the visiting cards of the representatives from their company. Booth visitors can download these Vcards.
-
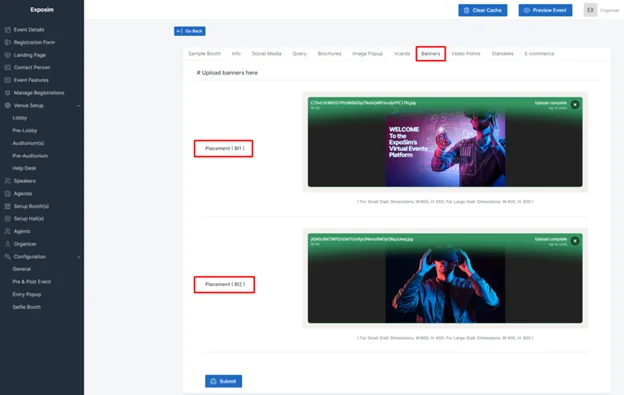
- Banners- There are two banners positioned on every booths. To add the images in those banners this section is used. The dimensions are mentioned below the upload area.
-
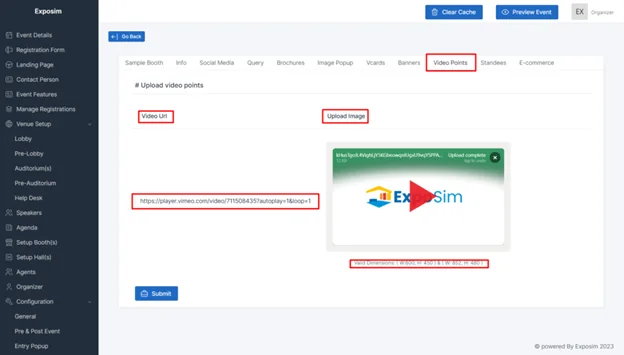
- Video Points- There is a TV on the booths. To add the video in the TV add the embed link of the video in this section. Apart from the video link, exhibitors need to add a cover image for this video which will acts as thumbnail image of the video.
-
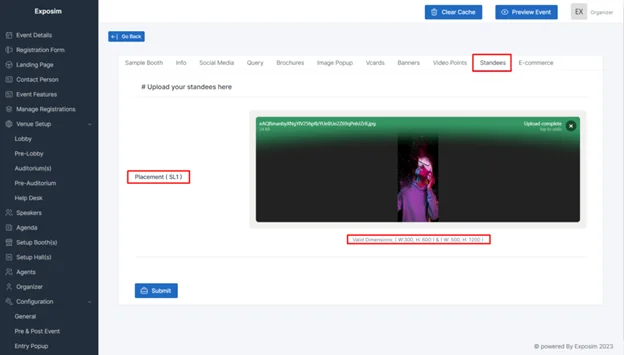
- Standee- This is a Standee on the booth, Exhibitors can add the image for standee from this section.
-
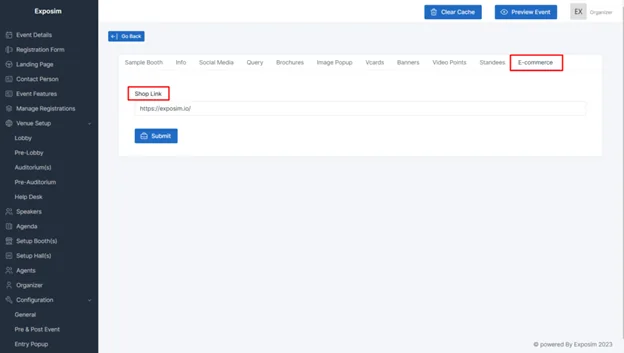
- E-commerce-If exhibitors has an e-commerce shopping website then they can add these links to this section.
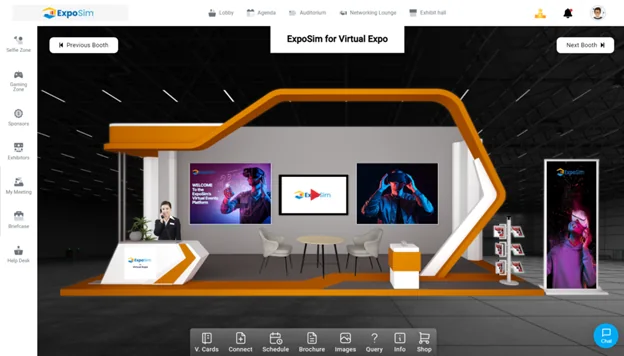
After adding all the creatives the booth will look like-
Setup Hall(s)
After creating the booths in the event link those booths to the Exhibition Hall. If organizers don’t link thoses booths to the hall, the booths will not be shown in the event.
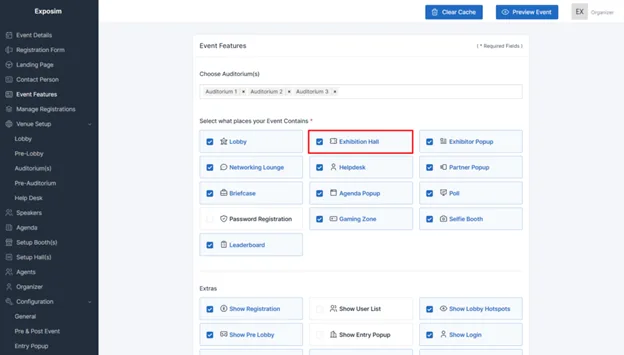
First enable the exhibition hall feature. To enable it go to Event Features → enable the Exhibition Hall→ Submit.
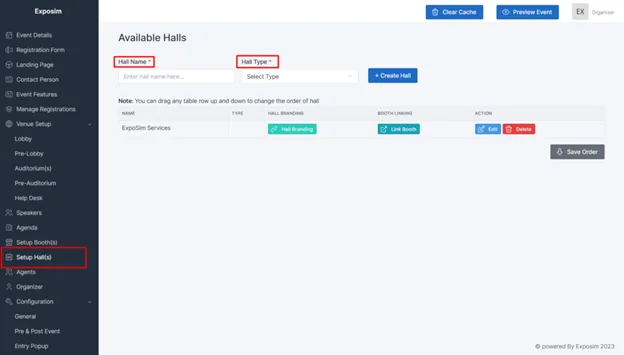
To create the Exhibition Hall, go to Main Dashboard > Setup Hall(s) > Write Hall name > Select Hall type (2D/3D)
How to Link booths to the Exhibition Hall
Linking 2D Booths-
To link booths to the hall-
-
- After creating the 2D hall click on Link booth Button on the hall.
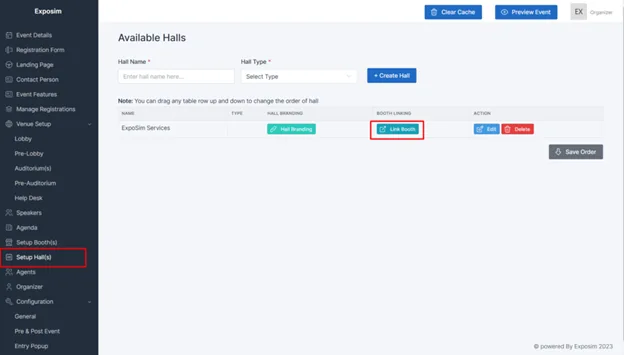
-
- Select the booth name and allot a order number to that booth and Submit. According to the order number, the booth will be placed in the hall.
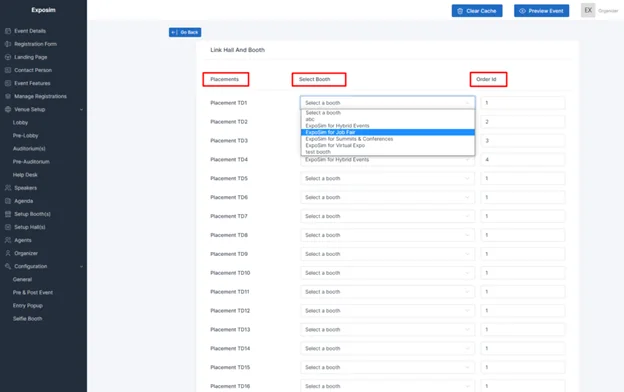
-
- After linking the booths to the hall, the hall will looks like this in the event
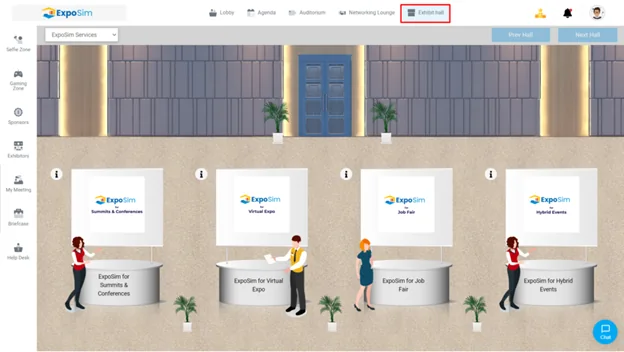
Note – You can link up to 30 booths in one hall. To increase the limit please contact ExpoSim Support Team at [email protected]
Linking 3D Booths-
-
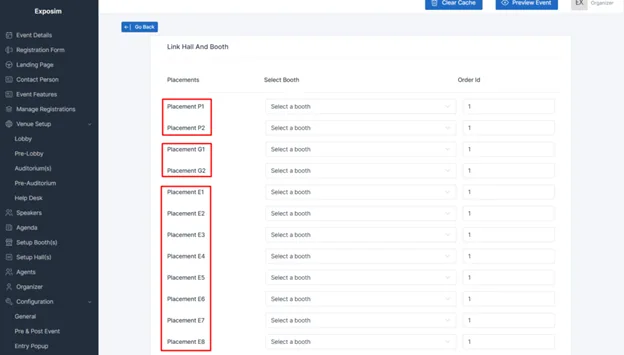
- There are three types of 3D booths – Platinum, Gold, Silver .
-
- P represents Platinum, G represents Gold and E represents Silver.
-
- Create a 3D Hall
-
- After creating the 3D hall click on Link booth Button on the hall
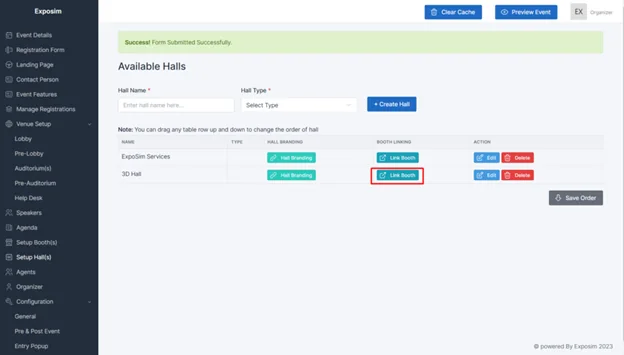
3. Here, Platinum booths can only be linked where the Platinum booth is attached and same goes for Gold and Silver
4. Select the booth name and allot a order number to that booth and Submit. According to the order number, the booth will be placed in the hall.
Agents
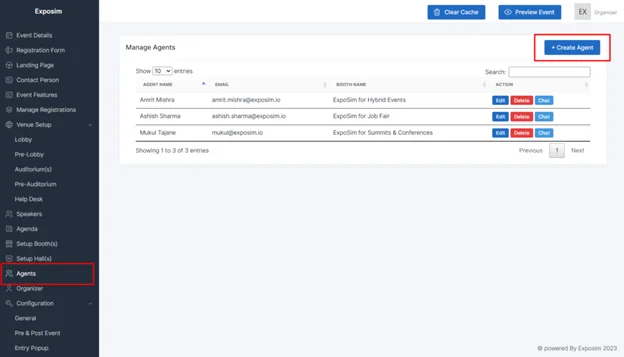
In this section, the agents added to the booths of the exhibitors will be shown. In order to enable chat and meeting scheduling feature on booths, Exhibitor should add agents to their booths.
Organizers can also create agent profiles and add them to therir respective booths.
To create agent go to- Main Dashboard > Agents > Create Agent
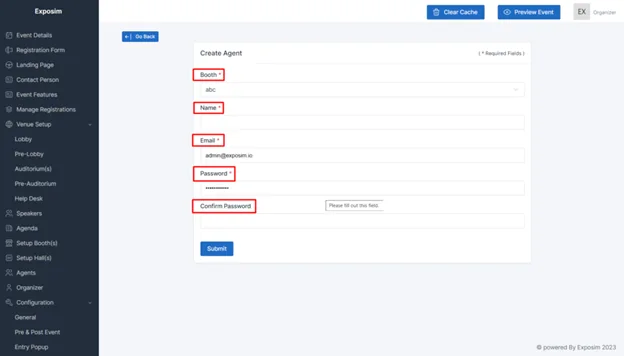
While adding a new agent, select the name of the company booth the agent belongs, his name & email and password for his Agent Dashboard profile.
Organizer
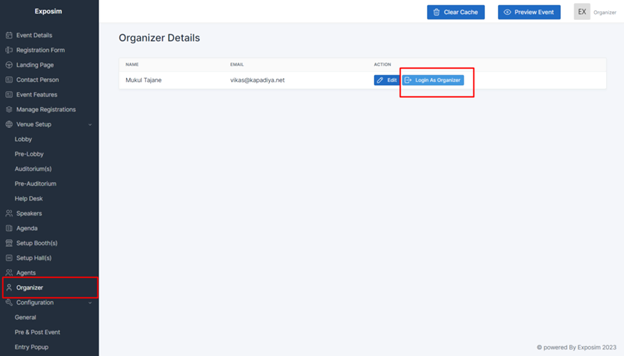
Organizer section is used to login to the Organizer Dashboard. As a Oraganizer to keep an eye on the event and track the real-time analytics of the event.
Organizer Dashboard is repsonible to get the analytics of the event. Using the Organizer Dashboard, organizer can chat with attendees to solve their queries, send Announcements and Polls. Send reminder emails to attendees.
Organizer dashboard is also used to add Networking Tables.
To access the organizer dashboard, go to Main Dashboard > Organizer > Login as Organizer
Click here to see how to use Organizer dashboard in detail
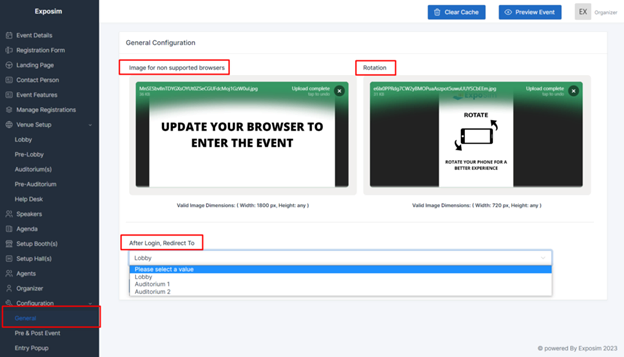
General
In the General section, organizers can add general instructions for the attendees. General Instructions like Rotate your phone (If attendee is using the plaform on mobile), Update your Browser (If attendee is using the platform in unsupported browser).
If organizers want the attendees should be redirect to the auditorium after login, then this can be done from general section.
To access the general section, go to- Main Dashbaord > General
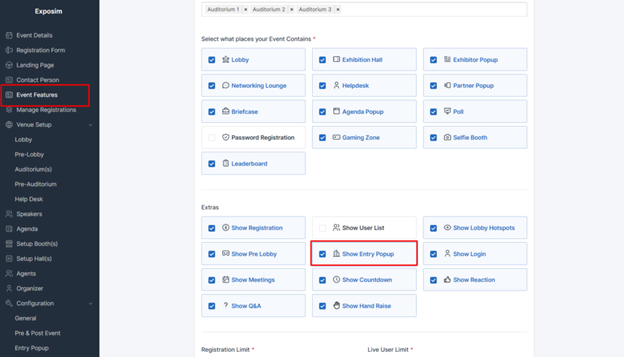
Entry Pop-up
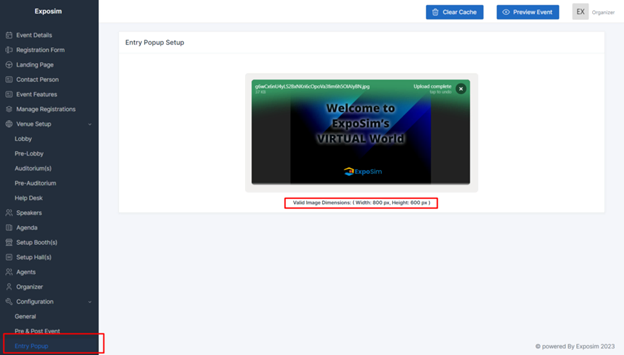
In entry pop-up, a pop-up will open once any attendee logs in for the event. This provides the extra branding space.
First, enable this feature. Go to Main Dashboard > Event features > Enable Entry Pop-up
To add creative in Entry pop-up section, go to Main Dashboard > Entry Popup
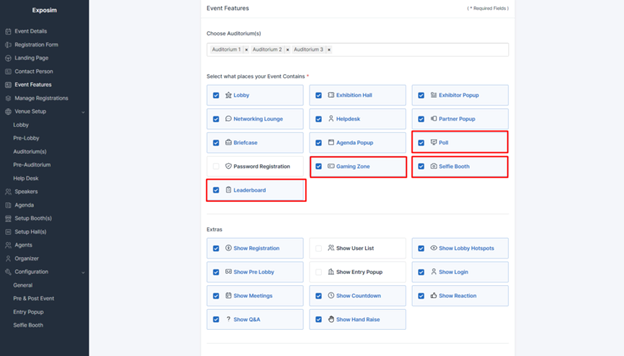
Engagement Features – Selfie Zone, Gaming Zone, Leaderboard, Poll
One of the significant benefits of hosting a virtual or hybrid event is the flexibility to keep attendees and participants engaged and make the best use of their valuable time. ExpoSim offers a range of engagement features to help event organizers create interactive and engaging virtual events.
To include the engagement features in your event, you first need to enable the engagement features from the main dashboard as shown below.
Polls
Polls can be sent from the Organizer Dashboard. Click here to see how to send polls to engage the audience. Organizer Dashboard.
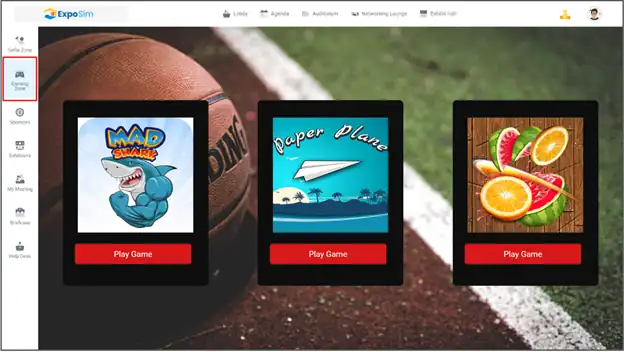
Gaming Zone
ExpoSim allows your audience to entertain and enjoy every bit of your event by providing gamification features. There are three default games added.
In case you need any further modifications or want any changes, please contact the ExpoSim team.
Selfie Zone
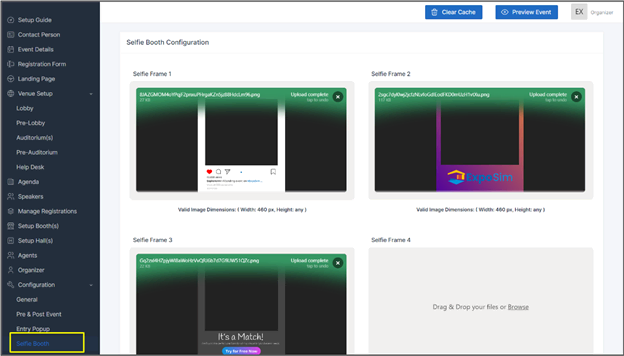
Take advantage of the selfie booth and let your audience capture a memorable selfie of the event. To set up the selfie booth of the event, follow the steps:
-
- Add the selfie frames for your audience to click their selfies in the event. Organizers can add up to 4 frames for the selfie booth.
-
- To add the selfie frames, go to Main Dashboard > Selfie Booth > upload the frames of the required dimensions.
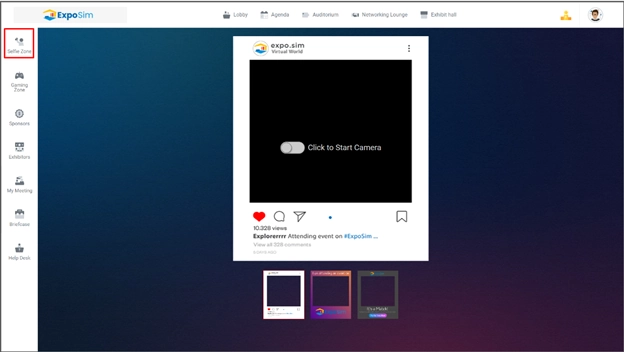
To click the selfie, attendees need to select the desired frame and start their camera and click the selfie.
Leaderboard
-
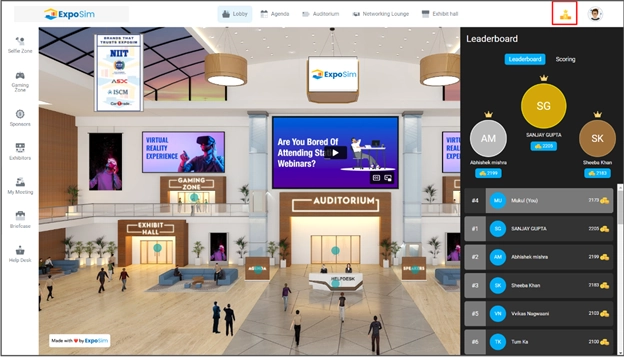
- There are certain points allocated to each activity you do in the event. You check the points for each activity and your total score in the leaderboard.
After you have successfully made a mark in setting up your Virtual Event, now is the time to keep diving deep into the efforts of making your virtual event successful.
Get to know about the best strategies and tips to make your Virtual Event a success.


